01 · The product list
Every product and variation, with stock at a glance

- Status tabs: All, Active, Scheduled, Draft, Pending review, Private and Trash.
- Search by title, SKU, product ID or EAN; the list narrows as you type.
- Filter by product type (simple, variable and so on).
- Filter by stock status.
- Name and WooCommerce ID. Click the row to open the editor.
- SKU. Variations are searchable by SKU too.
- Inventory: quantity or stock status, sortable.
- Variable products show how many variations they have.
- Price. A product on sale shows the sale price with the regular price struck through.
- Show categories opens the catalogue content panel: categories, tags, brands, shipping classes or attribute values.
02 · The product editor
One page, every field
The editor opens on a single page. Jump chips at the top scroll to each part; the cards on the right hold status and organisation.
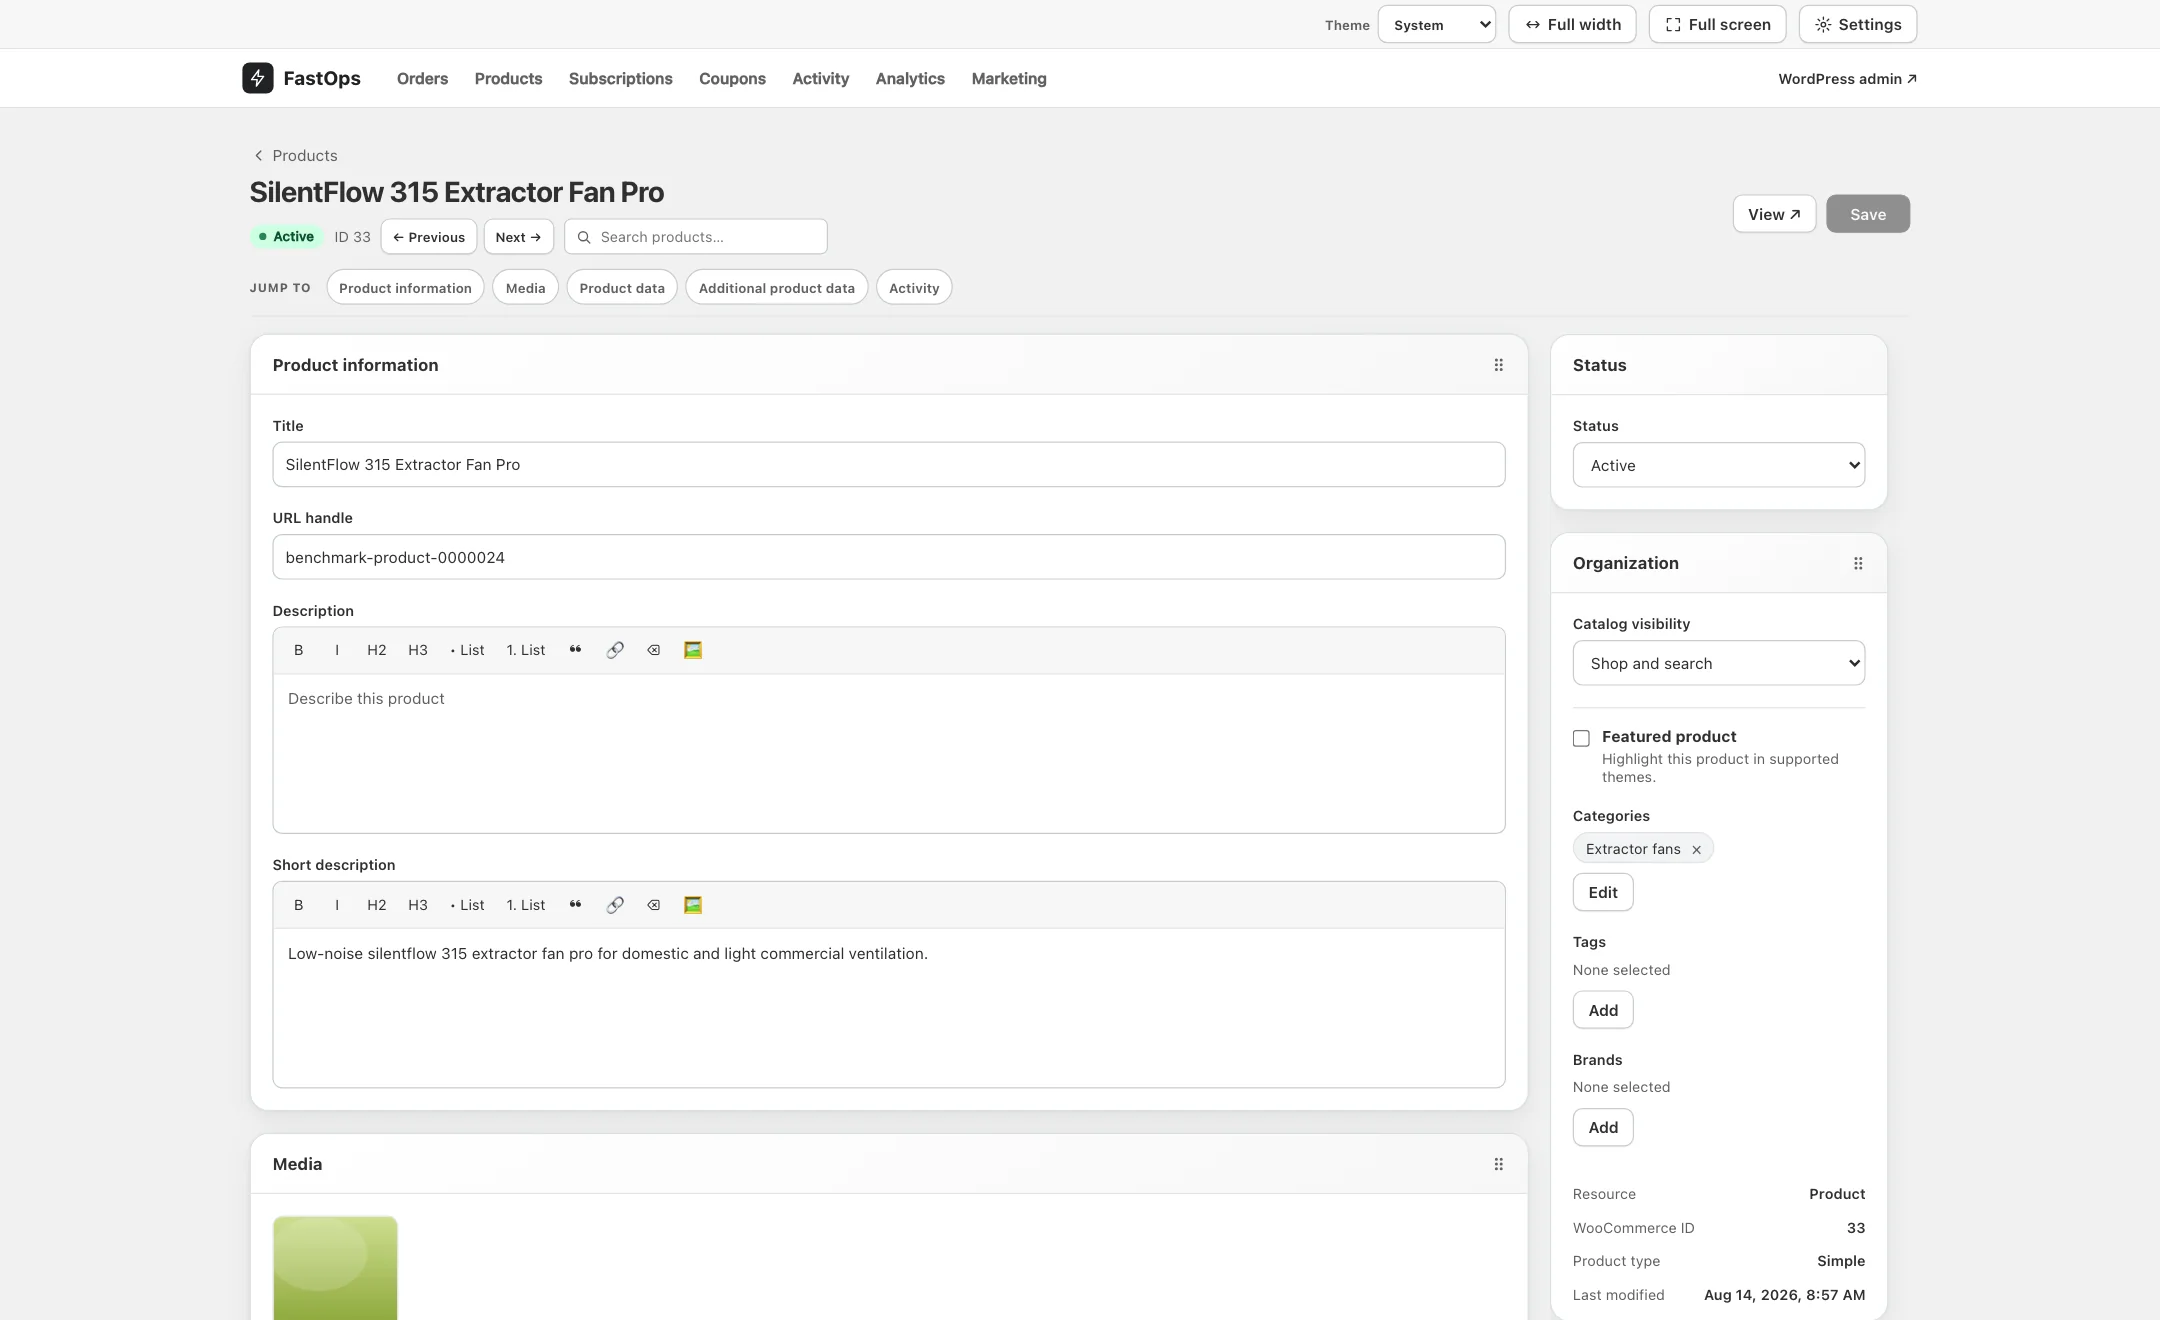
- Back to the list you came from, with your search and filters intact.
- Previous and Next walk through that list without going back.
- Search for another product to open.
- Jump to: Product information, Media, Product data, Additional product data and Activity.
- Title, with the URL handle below it.
- Description and Short description, with formatting tools.
- Status: Active, Draft, Scheduled, Private or Pending review.
- Organisation: catalogue visibility, Featured, Categories, Tags and Brands.
- WooCommerce ID, product type and when the product was last modified.
- View the product on the storefront.
- Save (⌘S). Greyed out until something changed.
03 · Pricing and sale schedules
Regular price, sale price, and when the sale runs
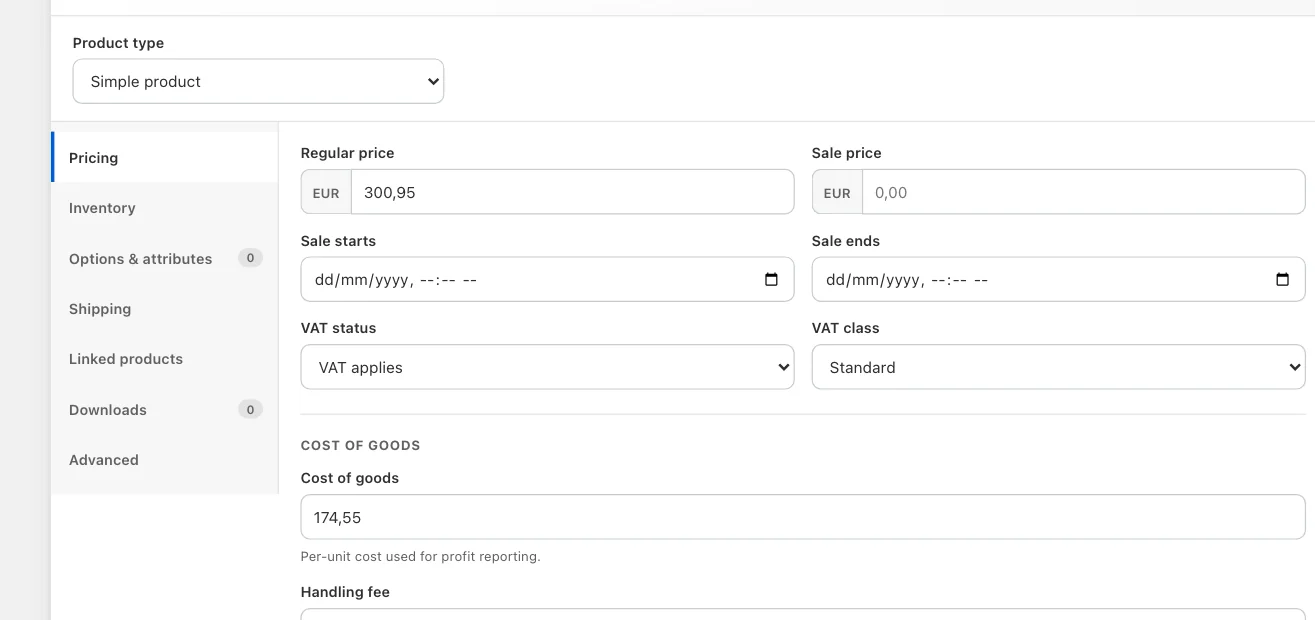
- Product type. Changing it to Variable adds the variations tools.
- Product data tabs: Pricing, Inventory, Options & attributes, Shipping, Linked products, Downloads, Advanced.
- Regular price in the store currency.
- Sale price. Leave it empty for no sale.
- Sale starts: the sale price applies from this date and time.
- Sale ends: leave empty for an open-ended sale.
- VAT status and VAT class, as in WooCommerce.
- Cost of goods, when a cost source is installed (see below).
Schedules use the store's timezone, as in WooCommerce.
04 · Stock and identifiers
The Inventory tab
Inventory holds the SKU, whether stock is managed, the quantity, the stock status, backorder setting and the low-stock threshold. Stock corrections are written through WooCommerce, so every extension that watches stock sees the change.
The WooCommerce ID is shown under the product name and in the Organisation card; it never changes and is what support will ask for.
05 · Variations
Edit variations inside the parent
- Set the product type to Variable and define the attributes used for variations under Options & attributes.
- Variations appear inside the parent product's editor. Open one to edit its own price, sale schedule, stock, SKU, weight, dimensions and image.
- To change many variations at once, select them and use the bulk update inside the product; it works the same way as the list-level bulk update.
Variations are also searchable by SKU from the product list, and stock filters apply to them.
06 · Categories, tags and media
Organise and illustrate
- Categories, tags, brands and shipping class are set in the Organisation card of the editor, or in bulk from the catalogue content panel on the list.
- Media lets you pick a featured image and gallery from the media library, upload new files, and reorder the gallery.
- Linked products holds upsells and cross-sells with the same picker.
07 · WPML translations
Switch language inside the editor
On a store with WPML, a product's translations are linked. Switch between them from the editor to edit each language, or create a missing translation; FastOps links it to the same WPML translation group.
The same applies to translated categories and other terms in the catalogue content panel: open a term to switch among its translations or create one, and the translated parent is linked automatically.
08 · ACF and extension fields
Additional product data
Fields added by supported extensions appear in the editor under Additional product data, grouped by the extension that owns them, with the extension's own rules and validation.
- Advanced Custom Fields: text, number, choice, true/false, date and time, image, file, gallery, post, term and user references, links, maps, multi-select, groups, repeaters and flexible content are editable. Groups are flattened into labelled sections; conditional rules are honoured live.
- A field FastOps cannot safely edit is shown read-only and named, and the rest of that structure is preserved exactly as stored.
- Values on the record that belong to no recognised extension are listed read-only and never rewritten.
See Integrations for the list of certified extensions.
09 · Cost of goods
Where the cost comes from
The Cost of goods field on the Pricing tab appears when the store has a cost source: WooCommerce's own cost of goods or a supported cost integration. Enter the unit cost here and it feeds the profit column on orders and the profit figures in Analytics.
Without a cost source, profit reporting is shown as unavailable rather than guessed.
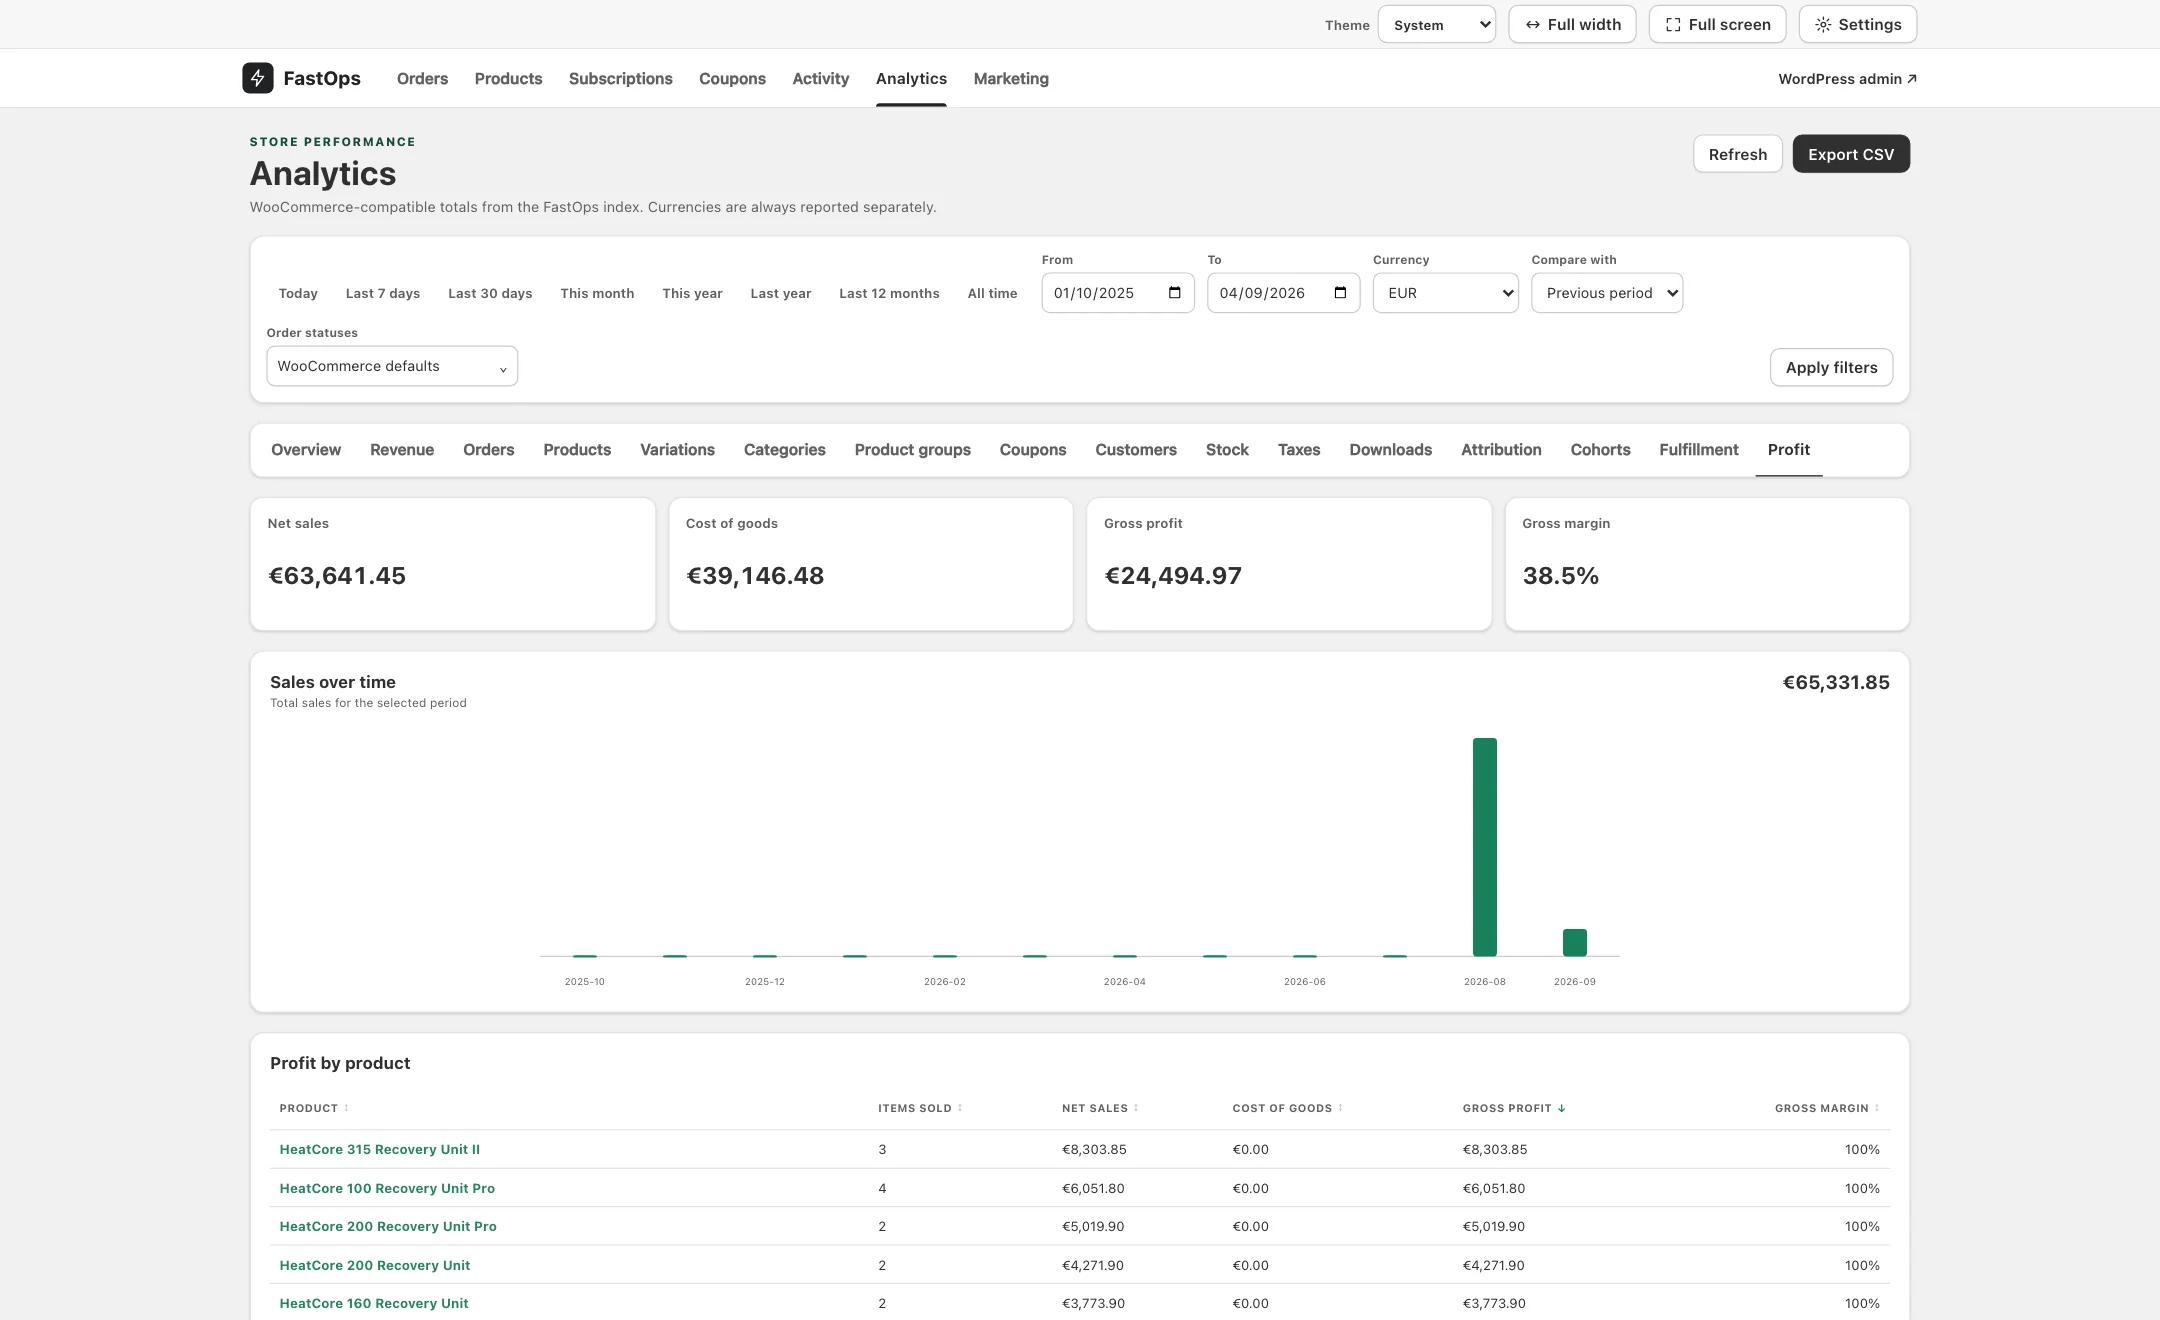
- The Profit report tab.
- Cost of goods for the period, summed from the costs entered on products.
- Gross profit: net sales minus cost of goods.
- Gross margin.
- Profit by product, sortable by any column.